Linda Carter, Stampin' Up! Independent Demonstrator
Sr. Supervisor

Thonotosassa, Florida

http://www.lindacarter.stampinup.net/

E-mail: lcart74@gmail.com

Showing posts with label big shot. Show all posts

Sunday, February 19, 2012

It's a RED HAT Day!!!

The Red Hats came  on Saturday, February 11, 2012 for their "play date" to make a few Valentine cards for their friends and family.  The whole group below is: (front - left to right) Me (Linda) and Abby Gale (puppy), Gabby, Lou, Pam, (back - left to right) Lee, Marcia, Queen Ginny, Shirley, Alice, Gwen, Cathie and Hilde.
The group showed up - in full Red Hat style, had a little meeting to go over details of their upcoming events and then were ready to make some cards.  
Gwen, Gabby, Alice and Shirley are ready to work and excited about making a sweet Valentine for that special someone.
 Marcia shows off her version of a Valentine using Stampin' Up!'s new heart shaped framelits.
Queen Ginny is so proud of finishing her first card!  What a sense of accomplishment each one felt as they finished their projects.
My dear friend, Kristine, busy teaching the techniques to prepare this card.  I am so grateful for Kristine's help when I have larger groups. We had 10 wonderful ladies join us for some fun to make cards and they all seemed to enjoy themselves.
Below - Hildi is pleased with a Valentine for her sweetie - with just enough hearts on it to make her happy.

Red Hat Day - Continued

Everyone made 2 Valentines and 1 general card with a sentiment of their choice.  Here the ladies are showing off their efforts at making the general card using the new Mixed Blossoms set with the Blossom punch.  (Oh my - not sure what I was talking about with my hands waving in the background, but really look a bit silly - - don't I?  Too funny! Smiles!)
Gwen's a "natural" card maker - - she really enjoyed adding her own special twists to all the cards.  This one was especially cool and she made her heart a little more distressed, which added a really cool effect.  Close up of Gwen's card:
 
Well the class went well and they all seemed to really enjoy themselves.  We will have to do this again soon.  It was the second time several of the ladies had attended the Red Hat Play Date for making cards.  We ended the afternoon with some sweet treats - yummy Red Velvet Valentine cupcakes made by Marcia (sorry - missed getting a pic of those) ... but trust me they were YUMMY!  
I gave each guest a Sweet Valentine treat also ... a pull up candy treat made with a retired set which had Red Hat stamps in it.  I thought they were cute and I think everyone else did also.  

 And a good time was had by all!  I am thankful to Pam Ashley for recommending the Red Hats come to my home for a card class and hope to continue to do this again in the future.  Pam was also a big help for the event on Saturday, which helped it to be a great success.  Thanks again to my helpers for the day, Kristine & Pam and for the excitement of the ladies, which makes it so much fun to offer these classes.  
Happy Stamping!
Linda

Tuesday, October 25, 2011

Revisiting Christmas in July Class

We made 2 of each of the 4 designs shown to get our collection of Christmas cards started.  The first one used the Serene Snowflakes set with some Pacific Point Blue ink and designer paper.  Added some bling & ribbon to finish it off.
Next, was our fun card made with the cute gingerbread man from the Got Treats set.  Using the zigzag border from the Tasteful Trim die, some Espresso Baker's Twine and some pearls for the buttons on our gingerbread men to dress them up a bit made this card complete.
One of my favorite Christmas stamp sets is the Come to Bethlehem set.  It looks so rich and elegant when stamped in Soft Suede and added to Cherry Cobbler card stock, layered with Soft Suede card stock using the Petals a Plenty impression folder.  We even added a little surprise inside by adding the impression folder on just the end of the inside vanilla cardstock to dress it up a bit for our sentiment.
The last project was a card using the circle scallop die with the Big Shot to create a folded scallop card making it look somewhat like an ornament.  We used the Delightful Decorations stamp set and some retired Christmas designer paper from last year to finish them off. 
Friday night group working on their cards and having a good time (Missy, Kristine, Lily, Tara, Leslie and Gloribi). 
Door prizes for the the Christmas in July classes - one for Friday night and one for Saturday night class.    A perfect thermal cup for crafting with a lid and straw included filled with various embellishments, etc. Leslie won the Friday night prize.
Susan had been missing from classes for several months due to a hip replacement surgery.  We were excited to have her back to join in the festivities of making some Christmas cards.  Susan has great luck at winning - - she returned and WON the door prize again on her first night back to class.  :o)  Everyone likes to pick at her - but it is truly just LUCK and she definitely has GOOD LUCK on her side - no matter which way we draw for door prizes!  Love ya Susan!  

Hope you enjoyed our fun with Christmas in July.  

Stop back to visit soon.
Happy Stamping!
Linda

Thursday, October 20, 2011

Funky Folds

Since I have not posted in quite a while - I will be sharing some of the projects we have made in classes over the past few months.  First - I must say I am ever so grateful to the many "creative souls" that are Stampin' Up! demonstrators who share their ideas and creativity with all of us.  We have a wonderful website dedicated to demonstrators only to be able to review and get ideas to share with our classes, that we may not have been able to create without the help of our "Stampin' Up! family".  Sometimes I borrow their ideas and change them up some to make it work with what I have or like and sometimes I just LOVE the way it looks  just the way they created it - that I CASE (copy and share everything) exactly their color combinations, etc.  So - again I want to say THANK YOU to all my fellow demonstrators who make this business a joy and a little bit easier for me.

These cards are from a Funky Folds class in August:

Our first card was made using the On the Grow (retired) set from the Summer Mini, along with the Blossom Bouquet Triple Layer Punch.  We watercolored the flowers and jar and added some Crystal Effects to the jar to add dimension so it looked more realistic.  The designer paper was from Beyond the Garden together with Pacific Point, Wild Wasabi, and Daffodil Delight CS.  Add some bling and you are done.  A very cool card that can be left up and displayed by the recipient nicely.

Another version was made using the new Lace Ribbon Border Punch, which I just LOVE!
 Next - was an easel card using the Top Note Die and My Friend stamp set with an added bonus of the bird from our Bird Builder Punch. We added texture to the bird's wings by running it through the Big Shot using the Elegant Lines Impression Folder.  I created this card from the ideas of 2 separate cards found on Stampin' Connection and hope you like how it turned out.  


Of course, we add just a few extra touches here and there with the banner for our sentiment and the new "In Color" Designer Printed Brads to finish it off.  Inks used were Lucky Limeade and Island Indigo of the 2011-13 In Colors. 

And then - we did a cute Christmas Card:
These color combos were seen on several websites (Dawn Griffith and Connie Babbert) and I loved them. The stamp set used is Snow Much Fun. I colored the skinny snowman's scarf, hat band, carrot and birds and then added some Dazzling Details.  I LOVE this stuff - so much neater than glitter (my customer's know I like the look of glitter - but glitter is NOT my friend!  I don't like how it seems to get everywhere - I guess it's a phobia of some sort for me!) So Dazzling Details is GREAT for me!  Glitter look without the MESS!  :o)
Color combos are: Old olive CS and DP with Black & White and Pool Party, Blushing Bride and White - who would have thought we would make a Christmas card with a color named Pool Party??  Only in Florida!!  :o)

Hope you enjoyed the Funky Folds projects. 
Thanks for visiting and Happy Stamping!
Linda

Saturday, October 15, 2011

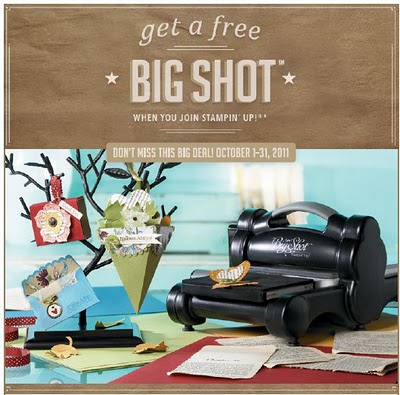
Get a FREE Big Shot!


Anyone who joins Stampin' Up! during October will get a FREE Big Shot!  And if you already have one, you'll get $100 in free merchandise of your choice instead.  Are you as excited about that offer as I am? 
I know there are some of you who have been considering joining Stampin' Up! but were just not quite sure if it was for you.  Well -  this should really help you decide; it sure would for me! And just in time for Christmas!  (WOO-HOO - Merry Christmas to YOU!)
In addition, the new-demonstrator Starter Kit--a steal at just $175--contains over $345 worth of stamp sets, card stock, ink, accessories, and business supplies-everything you need to start your new business.
There are so many benefits of being a Stampin' Up! demonstrator, including:


  • A 20 percent product discount!
  • A free monthly issue of Stampin' Up!'s demonstrator-only magazine, Stampin' Success!
  • Sneak peeks and pre-orders for brand-new products!
  • Invitations to exclusive Stampin' Up! events!
  • Regular get-togethers for demos only, at my studio.
  • Free access to an online community of 30,000+ crafters/stampers and creative artists, as well as 160,000+ project samples!
Please read all the details below (before you join).
Dates: October 1-31, 2011
  • Anyone that joins during the promotion period will receive a Sizzix Big Shot Machine or $100 in Stampin' Up! products of your choice from any of our current catalogs.
  • New recruits who join online will be given access to the Promotional Product Bonus one hour after they complete their online IDA (they will be provided a link to the ordering page for this redemption via e-mail).
  • In this order type, they will either enter the item number for the Big Shot (item 113439) or the item numbers for up to $100 in Stampin' Up! products.
  • Products can be chosen from any current catalog and shipping is free!
  • New Recruits should ensure that their free total comes as close as possible to $100 without going over since the Promotional Product Bonus order type will not allow items beyond $100 to be added to the order.
  • Those who mail in their Independent Demonstrator Agreements can simply list the items they want for free on their accompanying order form.
  • New recruits will have until November 30, 2011, to redeem their product bonus.
Here's what you get in the Starter Kits.  You have a choice of the standard stamping or the Digital and stamping kits.  They are both $175 but the value is over $440 with the free Big Shot (or substituted free merchandise).  What a steal!
The standard Starter Kit includes
  • Four complete stamp sets (including a clear-mount set and clear-mount block)
  • A Stampin' Around wheel, handle, and ink cartridge
  • Assortment of Designer Series Paper and card stock
  • White envelopes (40)
  • Four Classic Stampin' Pads
  • Two Stampin' Write markers
  • VersaMark Pad
  • Blender pen
  • Whisper White 5/8" satin ribbon
  • Textured embossing folder of choice
  • One ink refill of your choice
  • Adhesives
  • Color Coach
  • Cupcake Punch or one of your choice
  • Stamping sponge
  • Stampin' Mist
  • Box of Idea Book & Catalogs
  • Business forms and tools
     
The Digital+ Starter Kit includes
  • My Digital Studio digital designing software
  • His & Hers Digital Content Collection DVD
  • One clear-mount stamp set (including a clear-mount block)
  • Assortment of card stock
  • Note cards and envelopes (20)
  • Four Classic Stampin' Pads
  • Real Red 1/4" grosgrain ribbon
  • Brights Designer Buttons
  • Always Bird Décor Elements and applicator
  • Adhesives
  • Blender Pen
  • Stampin' Mist
  • Box of Idea Book & Catalogs
  • Business forms and tools

Tuesday, October 12, 2010

Baby Shower Invites

Just wanted to share the card I recently designed for a friend who was having a baby shower for one of her friends.  She sent me a picture of the blanket that was going to be used in the baby's room by the expecting Mom and requested I create an invite for her.   
Just too pretty with the shades of pink and green with flowers and butterflies.  Here's what I came up with - - - I used Pretty In Pink, Pink Pirouette, Rich Razzleberry, Certainly Celery and Melon Mambo.  Hope the new Mom likes it for her shower and baby memory book.
So - What do you think?  Leave a comment and let me know how you think I did using the inspiration picture provided. 

Thanks for stopping by.
Happy Stamping!
Linda

Monday, October 11, 2010

Fall is in the Air

We tried our hands at a few "new" techniques - at least "new" to us for some of our Fall projects.  One of our cards was from a beautiful card I saw and modified from one created by Mary Fish (one of my fav demonstrators).  We did a little "rock-n-roll", a little faux suede and then a little Big Shot work to create this nice card using the Crumb Cake, Early Espresso and Poppy Parade colors.
First, we created the unique layer by cutting a top note from Poppy Parade and then turning it half way around on the die and cutting it again - making the cool matting under the flower.  Then we used the rock-n-roll technique with Poppy Parade and Early Espresso ink to make the medallion from the Day of Gratitude Set.  We then created a faux suede flower using the 5-petal flower punch.  This technique involves using your bone folder to break down the fibers of the card stock until you are able to split the layers apart, creating the suede-ish look of the flower and topped it off with one of those wonderful new Antique Brads.  We then used the sentiment from the Seasonal Sentiments  on a piece of Very Vanilla to which we added some sponging around the edges in Poppy Parade to add more depth.  We used the Mat Pack to add some dimension to the upper right corner and there you have it an awesome card!

Next we worked on our 3-D project for the day.  We made a matchbox out of Chocolate Chip cardstock and used some left over designer paper scraps from last year's Autumn Meadows. 
We cut three (3) leaves using the Big Shot and Leaves #2 die.  Then we misted the cut leaves with some water and crumpled them up.  When we unfolded them, we added just a bit of chocolate chip ink to give them that distressed / dirty leaf look.  The greeting is from the Teeny Tiny Wishes set stamped on a scrap of Very Vanilla punched out using the Modern Label punch.  The finishing touches were to add a button with hemp twine wrapped around the box and threaded through it to tie a bow on top.  Now how cute is that!!??!!
The matchbox held some Hershey's nuggets wrapped with scraps (1" x 3") of scraps of Autumn Meadows to complete our little gift for someone special. 

Hope you enjoyed these projects.  I'll post the other projects we completed at class soon.  Thanks for stopping by. 

Linda

Tuesday, July 6, 2010

Elements of Style

I finally got the chance to play with my Elements of Style stamp set and am really looking forward to playing with it some more.  I saw this idea of spotlighting on Stampin' Connection and really liked the way it looked.  Changed a few of the factors, but it was basically pretty much a complete CASE job!!  Couldn't find too much to change - as they say - "why mess with perfection?"  Thanks for the perfect idea from Paula Tharpe (MrsOcean) on Stampin' Connection!


Played with a little different option based on something I saw Whitney Richardson do and added a bookmark made with the Two Tags Die to the little pocket of the torn section of the upper left hand corner. 


I know I should add the Smooch Spritz, but was a little timid because I loved the cards so much, I didn't want to risk messing them up. I haven't had a chance to play with the Smooch Spritz yet and have heard it can be quite tricky until you get the hang of it.  So, now I need to make them again and add some Log Cabin Smooch Spritz to add an even deeper element of age. 


I'll have to repost when I do the remakes with some added features.  Let me know how yours turn out and if you were brave enough to try the Smooch Spritz on your first attempts. 

Stamp Set:  Elements of Style, En Francais background and Because I Care (Hostess set for sentiment)
Paper:  first card = Night of Navy, Very Vanilla, Soft Suede
second card = Night of Navy, Crumb Cake
Ink:  Night of Navy, Soft Suede
Accessories:  vintage brads, twine (retired) and Kraft taffeta ribbon (sponged with Soft Suede ink), sponges, distressing tool, trio flower punch (retired)

Monday, July 5, 2010

Tropical Party and Cards

We had our Tropical Party and made some "tropically themed" projects a few weeks ago on June 25 & June 26. First, we shared some snacks and Pina Coladas and then started working on our projects. I cased a few ideas from Stampin' Connection to pull this class together. The first card was a Joy Fold card:


Stamps: Tropical Party and On Your Birthday
Paper: Island Oasis DP, Tempting Turquoise, So Saffron, Rose Red, Whisper White
Ink: Rose Red, Old Olive, Soft Suede, Pumpkin Pie
Markers: various to color umbrella and straw
Accessories: gold brad
The next card used the palm tree stamp from Tropical Party and the new lattice impression folder available in the Summer Mini Catalog.
Stamps: Tropical Party and Vintage Labels (retired)
Paper: Whisper White, Island Oasis DP, Old Olive, Tempting Turquoise
Ink: Craft White with White embossing powder, Tempting Turquoise
Accessories: Tempting Turquoise 1/4" grossgrain ribbon
Next we made a Tropical Sundress card, which was so much fun to see everyone's designs. Amos even changed his up by putting pockets on it making it look more like an apron (but I did not get a picture of it- sorry!)
I originally saw this idea on Patty's Bennett's blog and then again on Gretchen Barron's website, but finally got my chance at making one at my upline - Whitney Richardson's Luau Stamp Camp when I went to Daytona a few weeks ago and got to see what she was teaching her group. They are so much fun! You use the large scallop circle die with the Big Shot and then create your template using 4 scallop notches on the top of the dress and 10 scallop notches on the bottom of the dress.
Stamps: Great Friend and Vintage Labels (for sentiments)
Ink: various for each one (Rose Red, Basic Black and Tempting Turquoise)
Paper: Island Oasis DP, Pumpkin Pie, Tempting Turquoise, Old Olive, Rose Red, So Saffron
Accessories: Round Tab Punch, Large Oval Punch and Small Oval Punch (for purse) and Circle Scallop Punch and 1-3/8 circle punch (for sentiment), various buttons

Our 3-D project was a little gift bag made using the Fancy Favor Big Shot die. We ran it through the Big Shot twice using the Lattice Impression folder to soften the bag up and give it a basket weave type feel. We also made some flowers to decorate the bag with using the Island Floral die and used a clear gemstone brad for the center. We tied it up using the Pumpkin Pie 1-1/4" striped ribbon with a piece of linen thread to cinch it together.

Our time together was GREAT as usual and gave us all a summertime party feel to get us through the next month. Looking forward to our next class where we are planning to start some Christmas projects to get us all ahead of the game this year.
Thanks for stopping by - Happy Stamping!
Linda